Help / Support
✖
Gettting Started
Please follow the below steps to get up and running with the WiseEye Data Cam.
- Create an account here by entering your email address: https://wiseeyetech.com/my-account
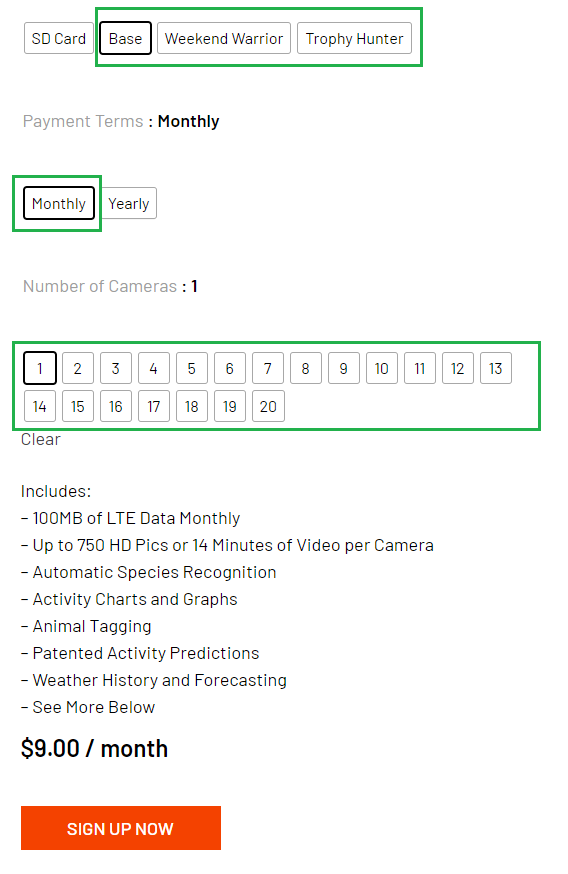
- Select a subscription from here: https://wiseeyetech.com/product/huntcontrol-subscription-ns/
- Under Subscription Level select Base, Weekend Warrior, Trophy Hunter
- Under Payment Terms select Monthly
- Under Number of Cameras: Select 1 (Or the number of cameras purchased)
- Select Buy Now
- Select Proceed to Checkout
Subscription pricing is charged in US Dollars however local NZ currency is coming soon.
- Populate the following fields, ensuring New Zealand is selected as Billing address Country.
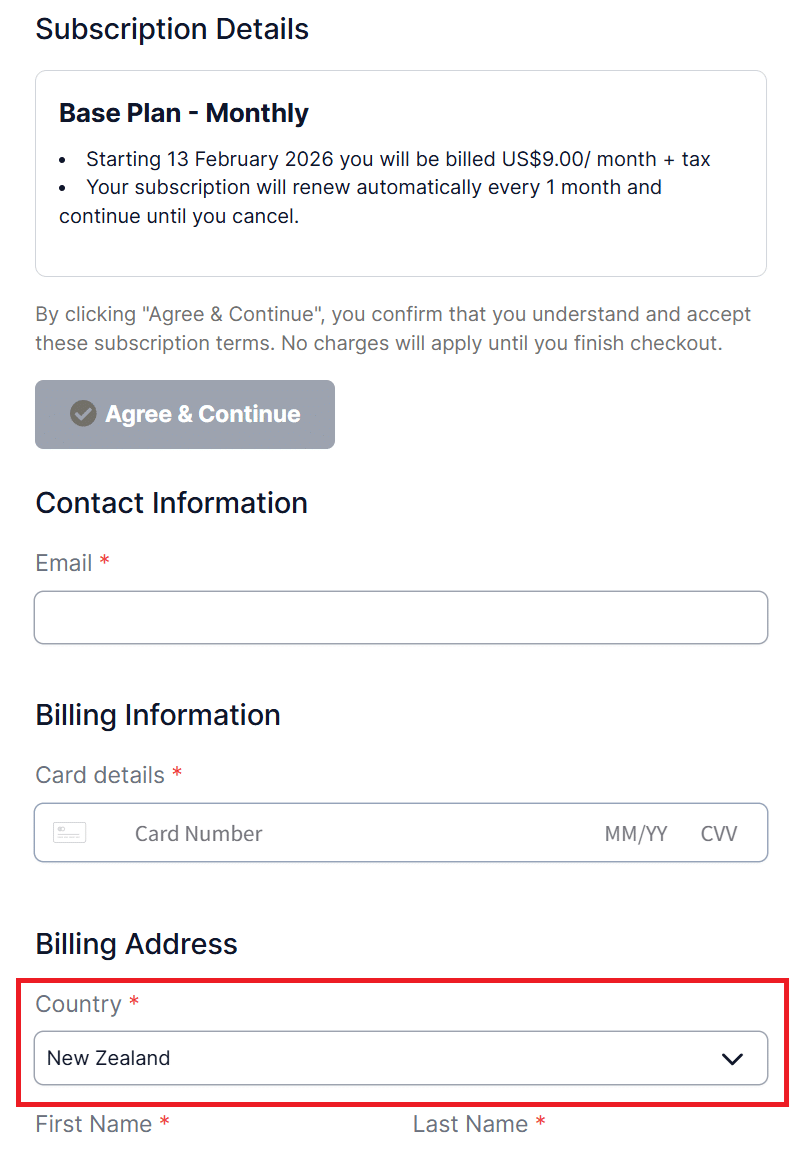
- Enter your payment details and select Pay Now.
Download the HuntControl 2.0 for Android or Iphone.

- Open the HuntControl App you downloaded previously to your phone
- Sign in using the account you created in Step1
- Select the Cameras | +ADD | CAMERA
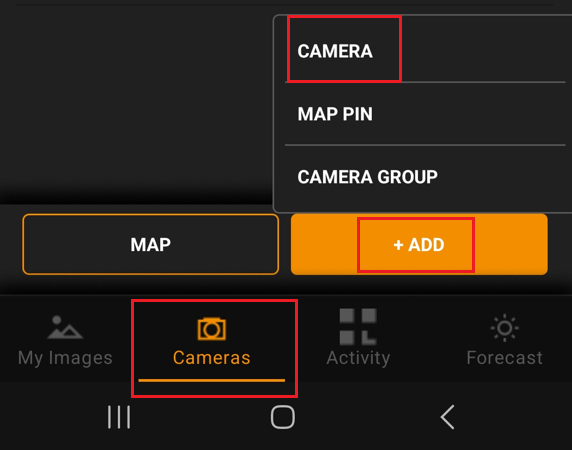
- Expand the Name section and give your camera a name
- Expand the IMEI section and enter the number provided to you via email (Or bottom of the Camera Box)
- Select Done & Save (Top Right)
Before installing your camera in the field validate is working correctly at home first, check:
- You have a valid subscription
- The camera has been added to your account using the IMEI provided
- Put the camera into Setup Mode, Wait for the Cell Signal and hit the OK button to send through a test image.
- See the DataCam and MinCam setup videos below for more information.
- Select you camera in the HuntControl App
- Select the Cog (Top Right)
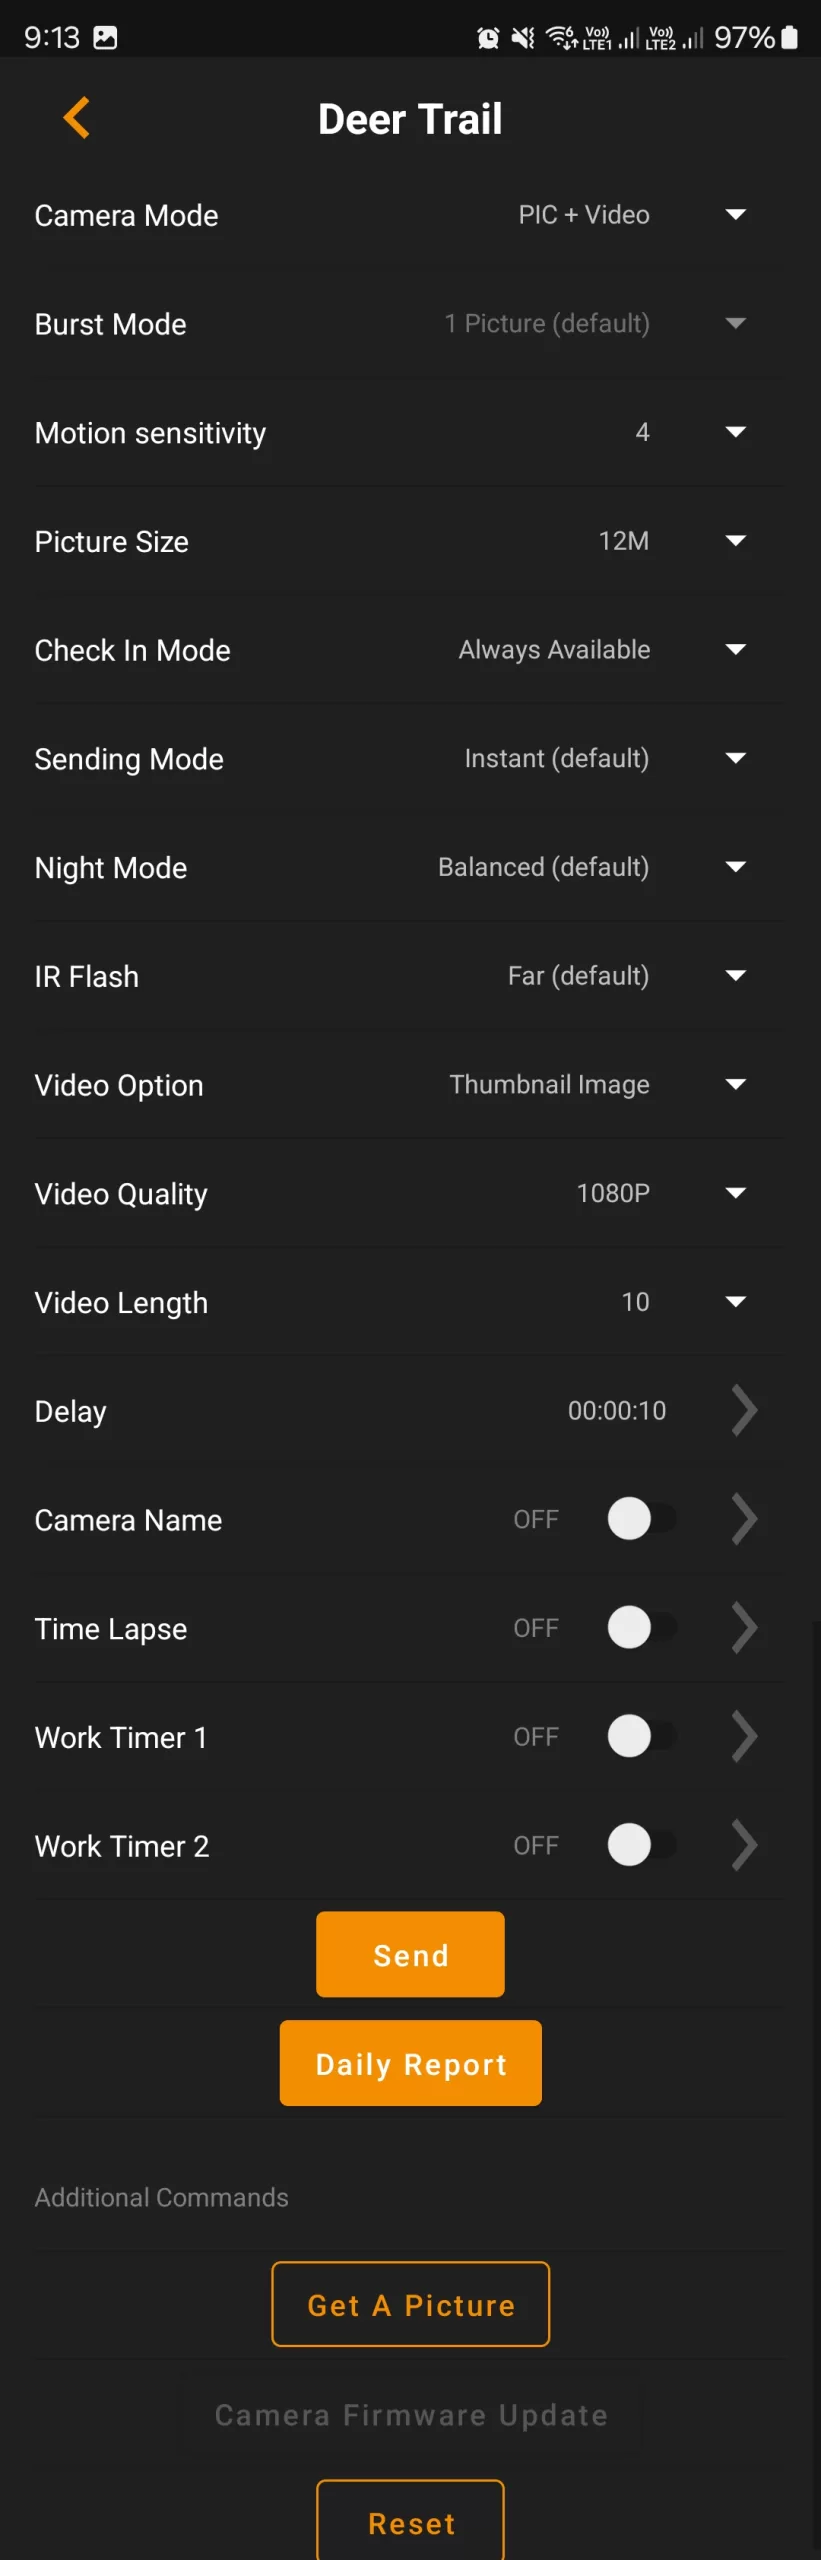
- The above settings are an example and explained below, the main considerations are when using AA batteries or the DC Li-Ion battery pack, to conserve power change the Check In mode to 4 x Daily, this will significantly conserve battery life.
- Power on the Camera and Verify Signal Strength at the intended deployment location, do this before mounting the camera!
- Switch the Camera to Setup, once the Signal is established Press OK Button to Take a Test Pic
- Validate the Test Pic has been received in the HuntControl App
- How to aim the camera? Watch this from the WiseEye team on how the camera PIR sensors work. https://www.facebook.com/share/v/1A7BdZ3YA8/
Subscription
Please watch the video from the WiseEye Team below.
Yes it will, images and video will continue to be written to the SD card picked up by motion events. Only the cellular sending has been deactivated due to insufficient data in the account.
Yes, further information is at A Guide to Suspending or Canceling Your HuntControl Subscription | WiseEye Learning Center
Purchase a data boost for your account – https://wiseeyetech.com/product/1890/
The Ranch Plan provides the best overall value, however, you need to have the following:
- 10 Cameras in account, only 1 needs to be active!
- $10 NZ camera per month
- $41 NZ Setup fee.
- Pay for the data you consume, e.g. $16NZ per 1GB of Data
- Monthly Plan – Stop at anytime
More information here: The WiseEye Ranch Plan
Connectivty & Deployment Questions
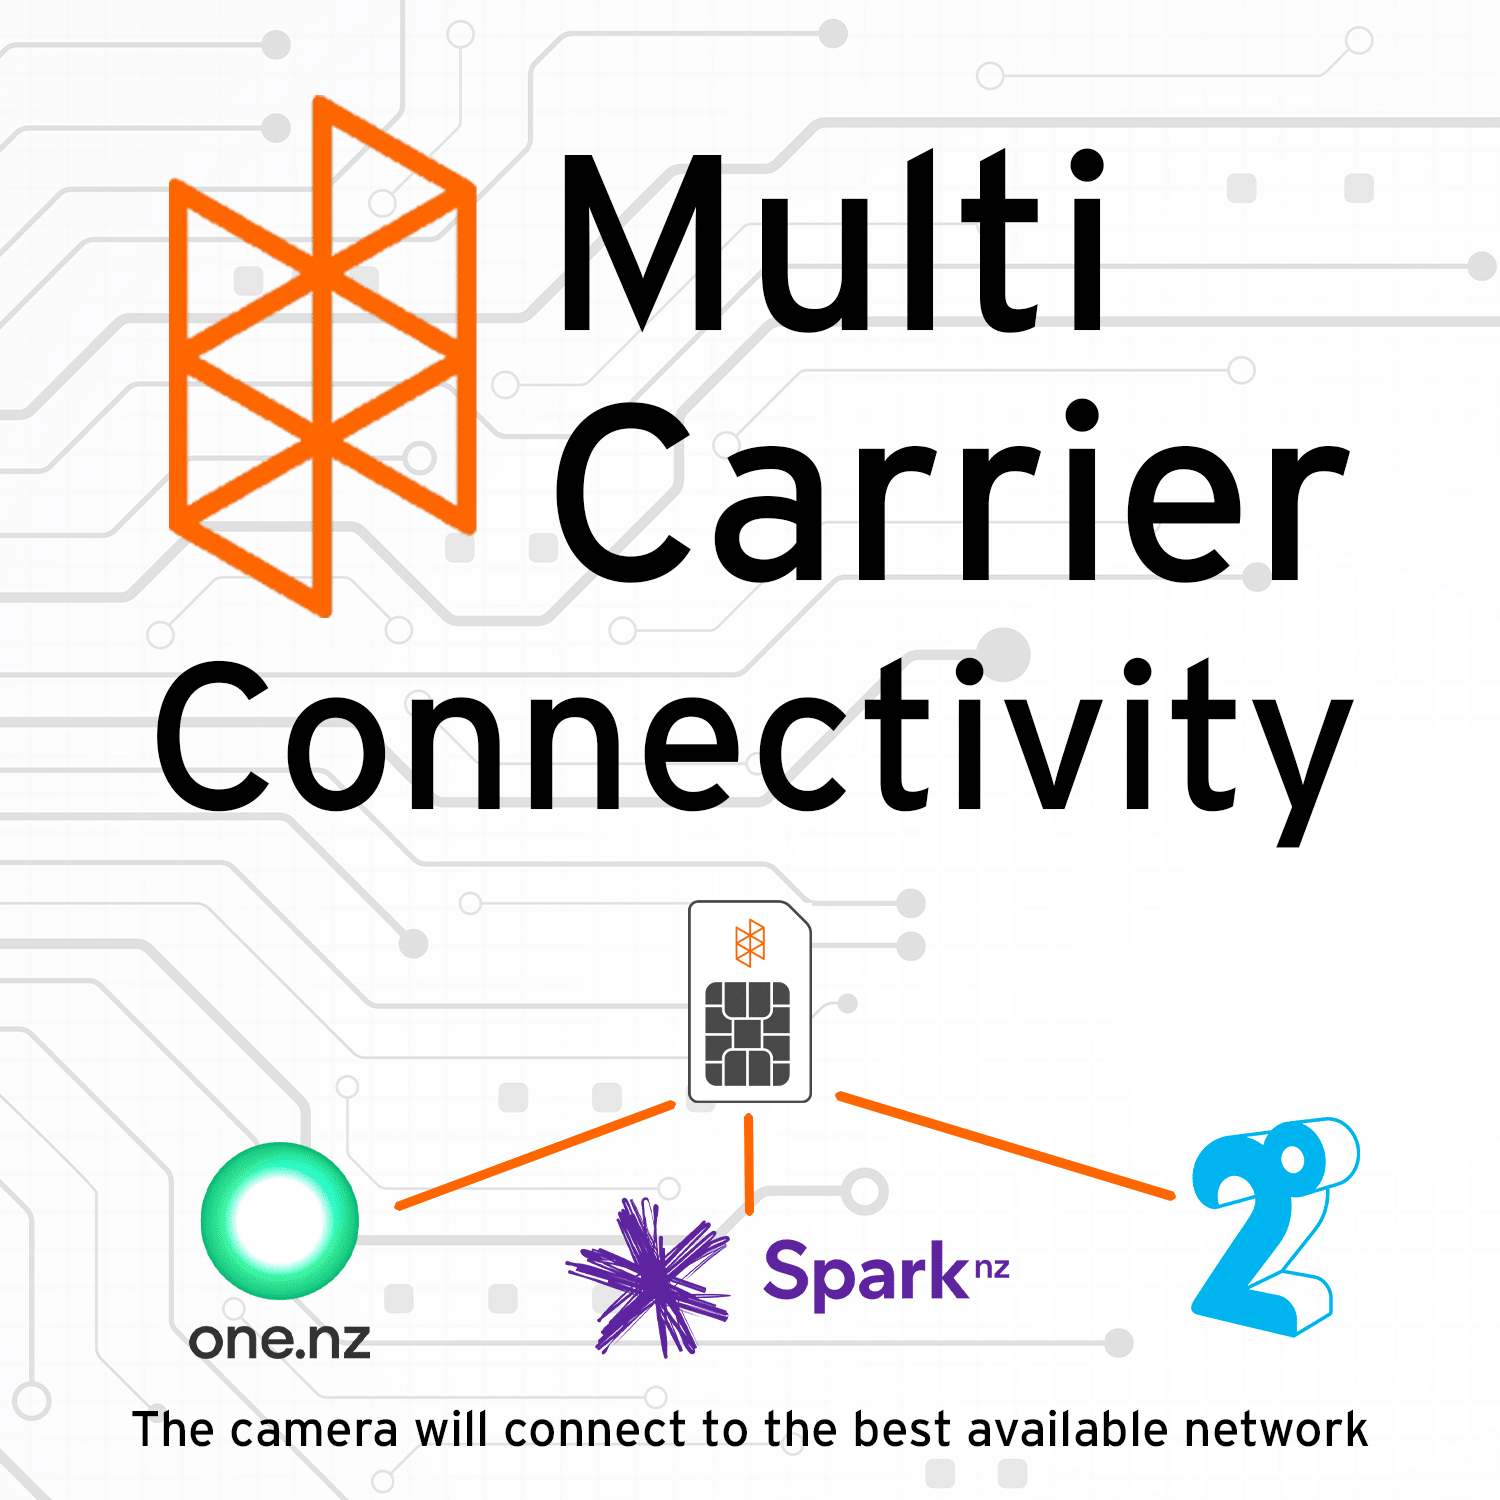
All WiseEye cameras have multi-carrier support and will automatically connect to the strongest cell tower provider, at the moment One, 2Degress & Spark are supported .The SIM card is included with the camera.
Potentially yes! The antennas on the WiseEye Datacams/Minicams are more powerful than your mobile phone.
- We’ve connected customers WiseEye cameras where they had no or little mobile signal at all.
- In extremely challenging terrain such as dense bush we’ve connected customers using external directional antennas
If you have any doubts get in touch, we can check your location and what cell tower coverage there is.
It can take up to 5mins to get a signal, the camera will search the network and attach to the strongest possible signal it can find.
General
For the DC2 range no, a non removable 32GB is installed. An additional 128GB can be installed if required but its not really necessary.
For the MC2 an SD Card is required. We recommended a Class 10 U 32GB to 128GB in capacity.
**Do not use a micro-SD card through an Adapter this is not a supported configuration.
**Do not use a SD Card larger than 128GB this is not a supported configuration.
No. All WiseEye cameras include a preconfigured SIM which is programmed to work in New Zealand. Every camera will need a monthly subscription to send data into HuntControl, if you have run out of data the camera continues to function. WiseEye Subscriptions can be found here:
The DC2 supports livestreaming, find out more here: https://trailtech.nz/help/#livestream
I have a specific requirement to detect species that are not currently supported by the HuntControl System. Is it possible that this support could be added in the future? Absolutely! WiseEye continually works on refining and enhancing its detection model capabilities. Please contact us at TRAILTECH for a further discussion.
Feel free to provide any feedback or share feature requests related to WiseEye Cameras, Mobile Apps, or the HuntControl Web platform. WiseEye values customer feedback and actively considers customer feedback when making improvements and updates. Please don’t hesitate to contact us!; your input is highly appreciated.
Do not purchase a WiseEye camera from overseas it will not operate properly in New Zealand. We have worked directly with WiseEye Technology to build and test cameras for the New Zealand market.
Before we send your camera we perform the following checks:
- There’s no damage to the camera housing, lens or antennas.
- Perform a power test using both internal AA batteries, internal battery (DC2 only) and external battery and solar panel kit.
- Format the SD card.
- Ensure the IEMI has been registered on the HuntControl System and is ready for activation.
- Validate images and video are coming through to our test account.
- We’ll follow up with you a few days after delivery has been confirmed and make sure you’re up and running
- Connect one end of a USB-C to USC-C cable into the USB-C port on the camera.
- Connect the other end of the USB-C cable into your phone port.
- Turn the camera into the Setup position
- Follow the USB prompt on your phone
- Copy data off the SD Card to a folder on your phone as required.
This process has only been tested on android but should be the same for iPhone where a USB-C connection is supported.
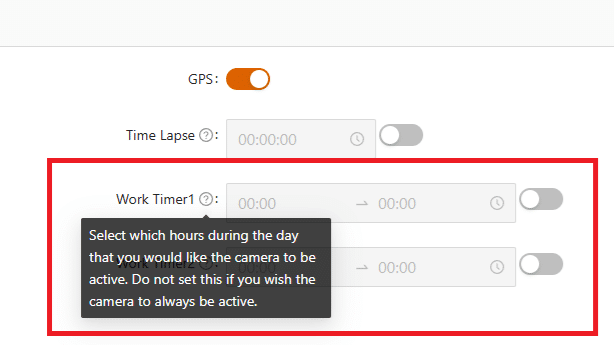
Yes, say for example you only wanted the camera to take images/videos between a certain time period, use the Work Timer 1/2 settings under the camera Advanced Settings to configure an operational time period.
IR Glow Type Explained
Low-Glow – Red flash at night. Longer range. Great for general use. Best images at night.
No-Glow – Nearly invisible flash. Ideal for ultra-stealth and sensitive areas, slightly blurrier images at night.
During the day there is no difference between Low and No Glow.
Resetting the camera will reset and reboot all settings and electronic components
within the camera to factory defaults.
1. Ensure the camera is in Setup
2. Select the Menu
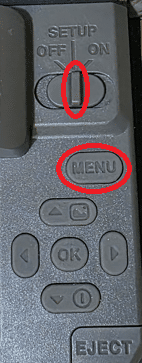
3. Select System
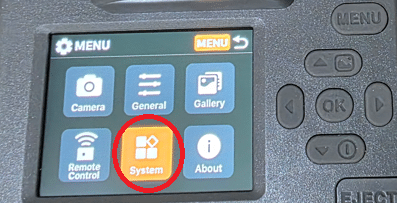
4. Select Reset
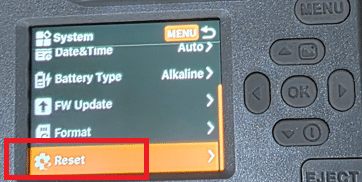
5. Select OK

6. Select OK

7. The camera will be rebooted, wait for a 4G signal (Can take 5 mins) and then hit the OK button to send a test photo into HuntControl.
Internal/External Power
As 4G trail camera technology improves so do the power requirements.
We highly recommend either the battery box with a 12v 18ah battery or the solar panel kit for the camera power source. Choosing between the two really depends on the camera deployment location.
For example, if deploying a camera on private land with little chance of discovery and there’s plentiful sunlight available then the solar panel kit would is the most economical and maintenance free option. For a covert deployment where the solar panel kit is not an option, the battery box solution is preferred.
The battery box can either be secured in a tree or on the ground. Our chew-proof cables should be used for either deployment, you don’t want to have to revisit the camera deployment after something has chewed through the power cable.
Both the solar panel kit and battery solutions will give many months of power compared to a typical month with 8 x AA batteries. Payback from either the 12v battery or Solar Panel will be realized after a few months compared to traditional AA batteries.
Internal Batteries
The DataCam DC2 runs on 12 AA batteries or the optional Li-Ion battery. The MiniCam MC2 runs with 8 AA batteries. Quality Alkaline batteries are the best option, whilst longer battery life can be achieved with Lithium AA batteries, they are not usually cost-effective.
Solar! Our Solar Panel Kit has 8 x internal Li-ion batteries installed providing 25000mAh!, that’s a lot of capacity! We have Solar Panels deployed that have not been visited since June 2023!
Less:
- Maintenance & travel costs
- Battery replacement costs
- Downtime avoidance
For maximum uptime and redundancy, pair your DC2 (with lithium‑ion battery) with the Solar Panel Kit. The camera will draw first from solar power and automatically switch to its internal battery when needed. The Solar Panel Kit also recharges the camera’s internal battery.
If you’re using internal AA’s or the DC2 Li-Ion battery and have an external battery source connected (battery pack or Solar), the external source will be used first.
In the DC2 cameras with the Li-Ion battery installed this will be charged by the Solar Panel if connected.
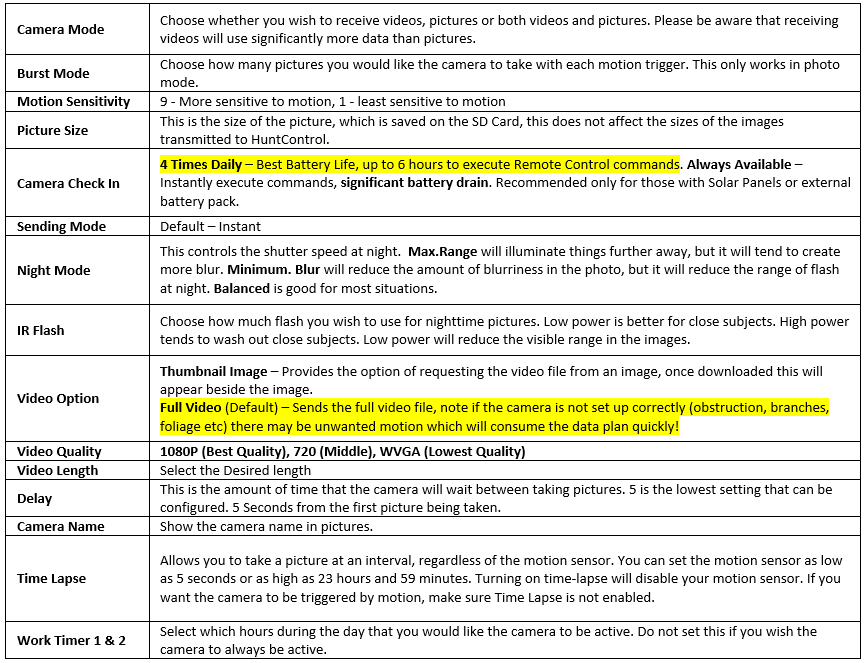
Camera Check In – Explained
4 Times Daily provides the best battery life, with up to 6 hours to execute remote control commands.
The exception to this is if you make a change to the camera settings and, in the meantime, the camera sends an image or video — it will process the change at the same time
Always Available – Instantly Execute commands to change camera settings, significant battery drain. Recommended only for those with Solar Panels or larger battery setups.
If you need the Always On setting then its recommended to use the Solar Panel kit or the External Battery Box
Change Setting
- In the HuntControl App Select Cameras
- Select the Cog icon for your camera
- Under Camera Check In – Select 4 Times Daily
- Scroll Down and select Send
Our Solar Panel Kit will keep your camera running 24/7, as long as:
-
There’s enough sunlight during the day to recharge the battery, and
-
The battery has enough capacity to power the camera overnight or during low-sunlight days.
The Solar Panel Kit has 25000mAh of power delivered by eight lithium batteries, we’ve had Solar Panels out since 2023 and never been back to them!
If you have your camera deployed and it starts sending too many images due to increased foliage growth or animal activity you have a couple of options to resolve this issue:
1. Increase the Motion Sensitivity (1 Lowest – Least sensitive to motion, 9 Highest – More Sensitive to motion).
Move to 1 and then adjust as required.
2. Disable the Motion Sensor, this will stop any motion related images being taken and sent through the network.
You can find these settings under you camera’s Remote Control settings.
Camera Specifications
Live Stream
Live streaming allows you to view your WiseEye DC2 camera in real time, but it requires a strong 4G connection and consistent power such as Solar Panel Kit or external battery box.
- Your camera must be in Always Available Mode. Live streaming will not work in 4 Times Daily Mode
- A strong cellular connection (60% signal or higher) is recommended for stable streaming.
- A 12V external power source is strongly recommended, live streaming uses extra power. The best option is the Solar Panel Kit with the DC2 Lithium Pack installed in the camera which is charged by the Solar Panel Kit.
To use Live-view with the WiseEye DC2 you must have firmware GMR2HArF903 installed on your camera.
- Live streams are limited to 5 minutes per session.
- After each stream, there must be a 1 minute cool-down period before starting a new stream.
- The stream is not recorded.
- Live streaming uses approximately 10MB per minute.
- WiseEye does not charge extra fees for live streaming. Data usage is counted normally and billed as part of your regular plan.
- You control your data usage—stream only as needed.
- Live stream performance depends on cellular signal strength, network congestion, and camera location.
- Results may vary by cellular carrier and location.
Most live stream issues are caused by one of the following:
-
Weak signal
-
Low power
-
Camera not set to Always Available Mode For this reason, WiseEye Support cannot troubleshoot live stream reliability beyond signal strength, power supply, and camera mode settings.
Quick Checklist Before Streaming:
-
Camera is in Always Available Mode
-
60%+ signal strength (or 3 bars or more)
-
Connected to external power (WiseEye Solar Charger recommended)
-
Latest firmware installed (required on DC2 units purchased before 11/1/25)
-
Waited 1 minute since your last stream
Support
Primary Support – New Zealand Customers
Email: [email protected]
Phone/SMS: 0210 264 3414
FB Messenger: https://www.facebook.com/trailtech.nz
On the very rare occasion, you can’t get hold of TRAILTECH support and you have an urgent issue please contact WiseEye below:
Backup Support (US Based)
Select Chat Form Home Page: https://wiseeyetech.com/
FB Group: https://www.facebook.com/groups/WiseEye
This camera is warrantied against manufacturer’s defect for a period of two years from the original purchase date, to the original purchaser.
Please contact us if you have a hardware issue.
Troubleshooting
There are several possibilities here, including:
- The camera has run out of power (Batteries (AA, External, Solar) being consumed, external power cable disconnected)
- Camera has a hardware issue
- SD or SIM card issue
- Adverse weather impacting cellular connectivity
- Subscription issues (No Data)
Please check the following:
- You have an active subscription and data
- Check the last image received and the voltage reading, is it low?
- Is the camera sending its daily check-in photo?
- Select your camera in the App
- Select the Cog (Top Right)
- Select Daily Report
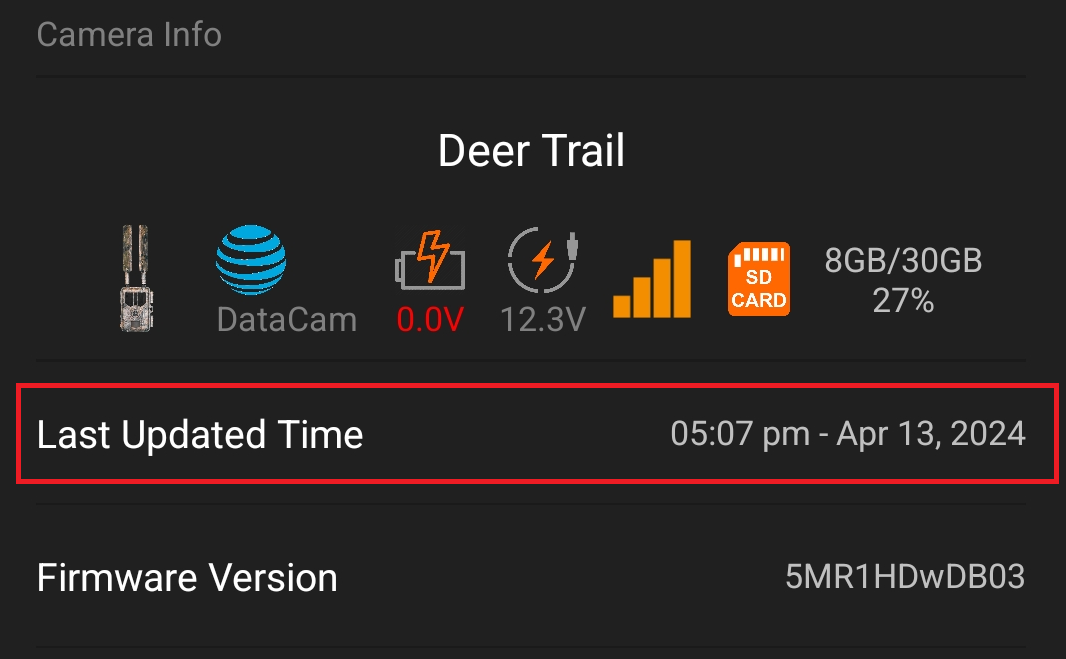
The remaining voltage readings for either internal batteries (right reading) or external batteries such as Solar or external connected batteries (left reading) are written to every image such as in the example below.

What voltage should should I replace the batteries?
Internal AA
10v – You should make a plan to replace the batteries.
External Batteries
Lead Acid – 12v – This is approximately %50 consumed, any further you’ll damage the battery.
Li-ion – 9.4v – The battery management system will protect the battery down to this voltage.
Solar
The normal operating voltage for the Solar panel is between 12v and 12.5v, if the voltage is consistently lower than this then the panel is not getting enough sun.
This is actually by design. Both the DC2 and MC2 feature multi‑carrier support, which scans for the strongest available network at startup. Depending on your location, it can take up to five minutes for the camera to lock onto a signal. Contact us if you are having issues.
Sharing Cameras
You can share any of your cameras with another person but they need a create a free HuntControl Account.
This is covered in the video below, alternatively you can also create one manually by following the instructions here: Shared Account User Registration – Wise Eye Data Cam